このドキュメントは有志により2014年3月の時点で翻訳されたもので、オフィシャルではありません。オリジナルのページはhttp://esenthel.com/?id=doc#Welcomeを参照して下さい。
This document is unofficially translated by users as of 2014/3. Please refer to the original document here: http://esenthel.com/?id=doc#Welcome
Copyright © Grzegorz Ṥlaziński. All Rights Reserved.
Esenthel エンジン ドキュメント
ようこそ!
Esenthel エンジン ドキュメントへようこそ。ここではエンジンを使用するために便利なリソースが見つかります。
インストール、使用方法、ゲームのパブリッシュなどカバーしています。
目次
インストール
ライセンス
Esenthel Engine License
Copyright © Grzegorz Ṥlaziński. All Rights Reserved.
Esenthel エンジンは商用でない場合は無料で利用できます。
Esenthel エンジンは商用である場合は有料でありライセンスの購入が必要です。
Esenthel エンジンを使用するアプリケーションは、アプリケーションのウェブサイトトップページにあるEsenthel ロゴ(http://www.esenthel.com/へリンクする)をアプリケーション含める必要があります。
Esenthelユーザは多くのサードパーティライブラリを使用していて無料で使用できます。
ハードウェア要件
Windows
・Windows XP 以降、32/64 ビット対応
・シェーダモデル 2.0 対応のビデオカード(GeForce 6, Radeon 9500, Intel GMA 900以降)
・SSE2 対応 CPU
Mac
・64 ビット Intel Mac OS X Leopard(10.5)以降
・シェーダモデル 2.0 対応のビデオカード(GeForce 6, Radeon 9500, Intel GMA 900以降)
Linux
・64 ビット Linux OS
・シェーダモデル 2.0 対応のビデオカード(GeForce 6, Radeon 9500, Intel GMA 900以降)
Android
・Android 2.3 以降、OpenGL ES 2.0 対応のデバイス
iOS
・iPhone 3GS, iPad 1, iPod Touch 3G 以降
ウェブ
・Chrome, Firefox, Opera (Internet Explorer は現時点で未対応)
インストール
システムファイル
Windows
Windows ではエンジンのインストール前に次を確認:
・最新の Direct X
Linux
Linux ではエンジンのインストール前にいくつかのシステム ライブラリのインストールが必要:
次のコマンドをターミナルから実行:
sudo apt-get install libxmu-dev libxi-dev libxinerama-dev libxcursor-dev libudev-dev libopenal-dev unixodbc-dev lib32z1 lib32stdc++6 nvidia-cg-toolkit
Esenthel エンジン
- 希望バージョンの Esenthel エンジンを一覧から選択する
- Download ボタンをクリックして利用可能なファイルを表示
- OS に合わせたバージョンを選択
- インストーラを保存するか、実行可能ファイルをそのまま実行
- インストーラ上でエンジンのインストール先を入力、次の例を参考にする
・Windows - "C:\Esenthel"
・Mac - "/users/*/Esenthel"
・Linux - "/home/*/Esenthel"
- OK ボタンを押下し、インストーラがファイルのダウンロードを開始
- インストール完了時にエンジン起動のショートカットアイコンをデスクトップ上に作成
ビデオチュートリアル
ライセンスキー
Esenthelエンジン エディタは席数ベースでありライセンスキーを使用する。
Esenthelエンジンを購入すると、1 つのライセンスキーを受け取る。
1 つのライセンスキーを使用してエディタのインスタンスを同時に 1 つ起動できる。
複数のインスタンスのエディタを同時に起動するには、複数のライセンスキーが必要となる。
しかし 1 つのライセンスキーを複数のコンピュータで使用することは可能だが、同時には使用できない。
例をあげると
- ライセンスキーによりWindows 機で開発をする
- プロジェクトを別のコンピュータ(例えば Mac)と複製/同期
- 同じライセンスキーで新たなコンピュータ上でエディタを実行
- 新たなコンピュータ上でエディタはライセンスキーを紐付けるように促される
- 新たなコンピュータとライセンスキーを紐付けた後、エディタが使用できるようになる
ライセンスキーは同時に紐付けられるコンピュータは 1 台。
Esenthel ストアからライセンスキーを別のコンピュータに紐付けできる。
紐付けを変更することはエディタが必要なときに促す仕組みであるため、自ら変更する必要はない。
コンパイラ
コードをコンパイルするため、 C++ コンパイラのインストールが必要
Esenthel エンジンは次の複数のコンパイラに対応:
Windows
Microsoft Visual Studio 2008-2013.
最新バージョンは次のリンクからダウンロードでいる。複数バージョンあり、Windows、Windows デスクトップのうち後者を選ぶこと。
Mac、iOS
Linux
Android
Android アプリケーションの作成は Windows, Mac, Linux 上でサポートされている。
選択したプラットフォーム上で次のプログラムのインストールが必要
- Java SE Development Kit (JDK)
- Google Android SDK
- Google Android NDK
Java SE Development Kit (JDK) のインストール
Java SE ダウンロードから java Platform (JDK) のリンクをクリック
OS に合わせたバージョンを選択(x86 は32 ビット OS 向け、 x64 は64 ビット OS 向け)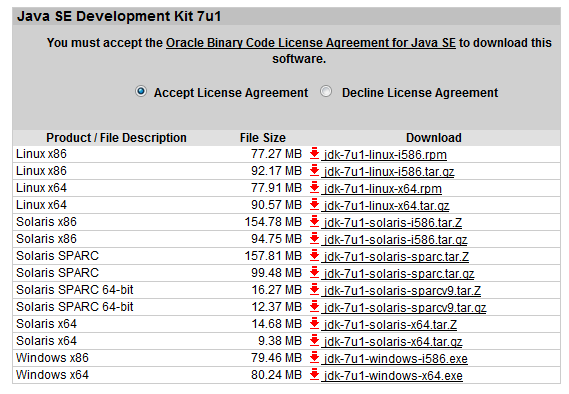
インストール時に不要となる Demos and Samples と Source Code のチェックを外す。
Android SDK のインストール
Android SDK ページへ移動する。
Download the SDK ADT Bundle ボタンはクリックしない。
"USE AN EXISTING IDE" フィールドをクリックしてその先にある "Download the SDK Tools" をクリック。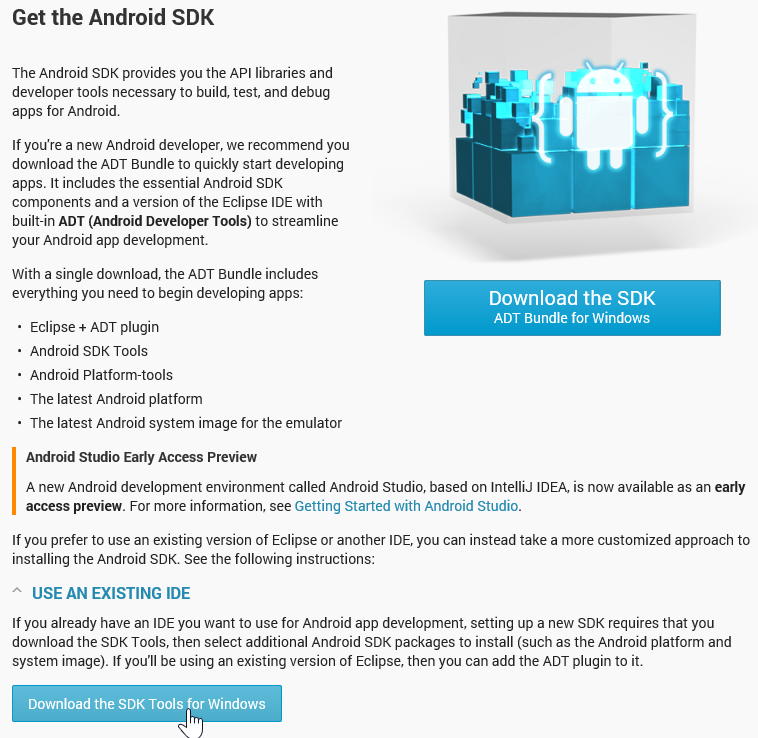
インストールした後、Android SDK から "SDK Manager" アプリケーションを実行し、インストールパッケージは次のとおりとする:
Tools
Android SDK Tools
Android SDK Platform-tools
Android SDK Build-tools
Android 2.3.3 (API 10)
SDK Platform
Intel x86 Atom System Image
Extras
Google AdMob Ads SDK
Google Play Billing Library
Google Play Licensing Library
Google USB Driver
Intel x86 Emulator Accelerator
2.3.3 SDK のみ選択する。他のバージョンは Esenthel で対応していない。
もし 2.3.3 SDK を使用して開発すると Android 2.3 以降のデバイスでアプリケーションを実行できる。
"Install Packages" ボタンをクリックし、新規ウィンドウで "Accept All" ラジオボタンを選択してすべてのパッケージのライセンスで Accept とし、Install をクリック。
SDK Manager がパッケージのダウンロードを開始する("'adb kill-server' failed -- run manually if necessary." というエラーが出る場合があるが、無視できる)
Android NDK
Android デバイスを開発向けに設定する
・Android デバイスを USB ケーブルで接続
・Googld ドキュメントにしたがって、Anrdoid デバイス向けの USB ドライバをインストールする(いくつかのデバイスではドライバのインストールは不要)
・Android 4.2 以降、デバイス上で「開発者向けオプション」を有効にする必要がある
・「設定」を開き「端末情報」(または「タブレット情報」)タブに移動
・「ビルド番号」を 7 回クリックで「開発者向けオプション」が画面表示される
・「開発者向けオプション」が設定に表示される
・「開発者向けオプション」をON にした後「USB デバッグ」オプションを有効化する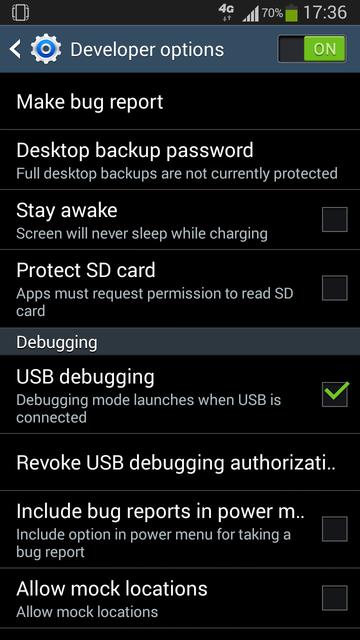
ウェブ
ウェブ向けアプリケーションの作成は Windows でサポートされる。
Emscripten をダウンロード、インストール(Web または Full Installer を選択することでパスが自動セットされる。Portable は選択しない)
Emscripten は C++ コードを JavaScript に変換するテクノロジーである。
Emscripten をインストールした後は、 Esenthel Editor で "Web JS" ビルドプラットフォームを指定し、ウェブ向けのアプリケーションが作成できる。
マウス
Esenthel エディタはマウスの追加ボタンを有効活用するため、 5 ボタンマウスがあるとエディタ上でとても便利である。
ロジテック G700S マウス
エディタには、マウスボタンに割り当てたショートカットがある:
・左クリック-選択
・右クリック-コンテキストメニュー/選択オブジェクトの移動
・中クリック-カーソル下のウィンドウを閉じる/カメラの回転
・4 ボタンクリック-カメラの移動
・5 ボタンクリック-カメラの回転
カメラの回転は 2つ ボタンに割り当てられている。中ボタン-追加ボタンがない場合、5 ボタン-追加ボタンがあり、中ボタンをホイール使用に主に活用する場合
基本
チュートリアルの使用
プロジェクトリスト
Esenthiel Editor をインストールして開いた後 Tutorials プロジェクトを含んだ Project List スクリーンが表示される。
アイテム上でマウスオーバーした後、実際のフォルダ名を参照することが出来る。(これを覚えておくと後あとで便利である。)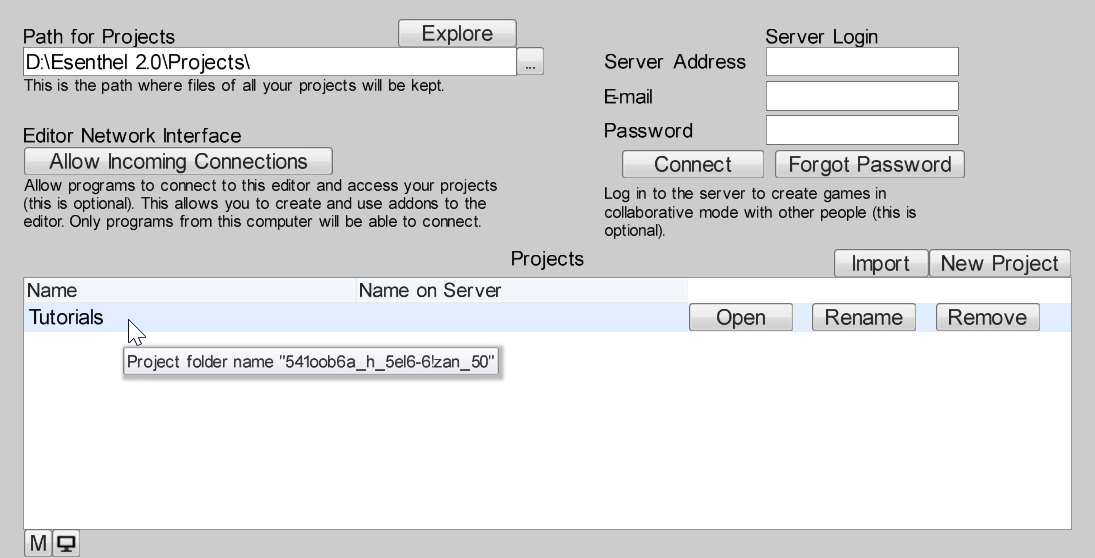
プロジェクトコンテンツ
プロジェクトを開いた後、Project Elements と呼ばれるコンテンツが参照出来る。
具体的には
・ アプリケーション
・ ソースコード
・その他のアセット
アプリケーションの隣のチェックボックスにより、現在アクティブであるか示す。(一度にアクティブに出来るのは一つのみ。)
Tutorials プロジェクトには様々なゲーム開発トピックをカバーする 100 以上のアプリケーションが含まれる。
アプリケーションの開始
"1 - Basic App" という名前のアプリケーションのチュートリアルを始めてみましょう。
デフォルトでアクティブになっていて(隣にあるチェックボックスが有効)、設定変更の必要がない。
次に画面の下にあるPlayボタン をクリックする。
チュートリアルをひと通りみておくことを強く推奨する。ソースコードを眺めて、試しに変更してみるなどすることで多くのことが学べる。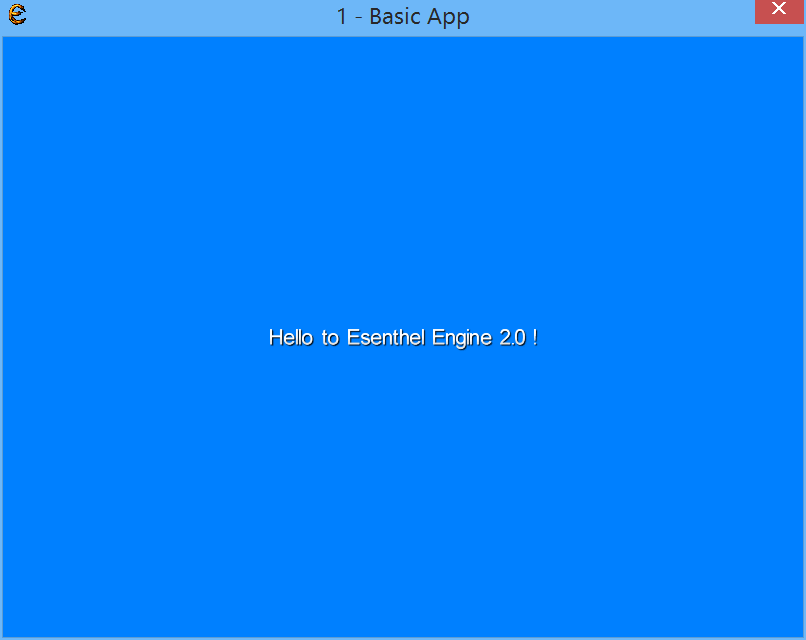
ビデオチュートリアル
アセットのインポート
Esenthel エンジンでアセットをインポートするにはプロジェクト領域でファイルをドラッグ&ドロップする。
新規のプロジェクト エレメントが自動的に作成される。開くにはダブルクリックする。
プロパティを参照するには右クリックをして Properties を選択する。
エレメントの修正
エレメントの修正をしたい場合、元のファイルから修正する場合も、あるいは別のファイルから修正をする(エレメントの ID を保持)場合のいずれでもエレメントを右クリックして Reloadを選択する。
オプションとしては、別のソースファイルを選択してYesを選択しする。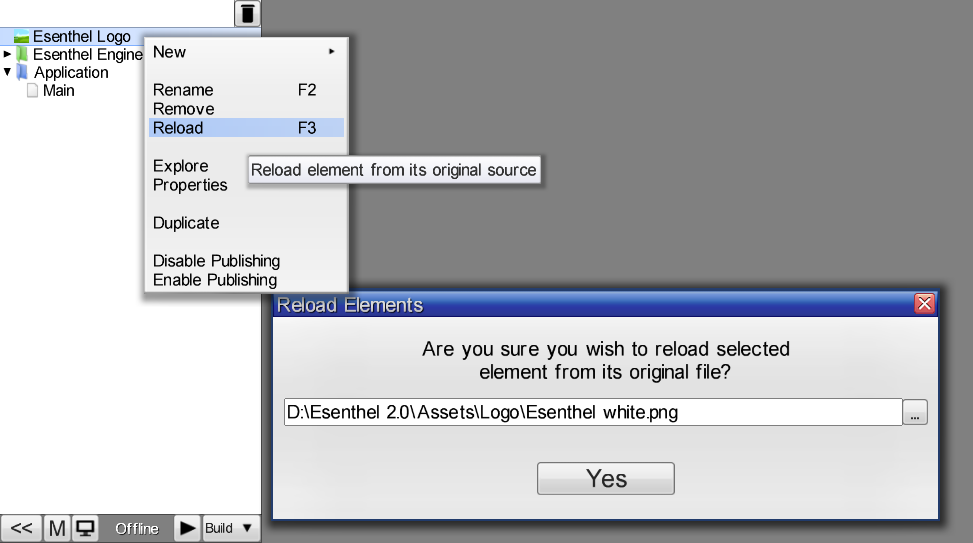
エレメントの作成
新規のエレメントを空で作成する場合、プロジェクトの任意の場所で右クリックしてNewを選択する。
手動で作成したオブジェクトも他のファイルから修正できる。Reloadを選んで修正するためのソースファイルを選ぶ。
アセットの種類
様々なアセットの種類をインポートする場合の詳細については次のページを参照する:
・画像
・3Dモデルとアニメーション
・音声
・動画
エンジンが認識できないファイル形式はローファイル エレメントとしてインポートされます。これは元ファイルを複製したバイナリです。C++のFileクラスを通じてアクセスできる。
ビデオ チュートリアル
共同作業での開発
EsenthelエディタはCollaborativeモードでのプロジェクト編集に対応している。
複数の開発者が同じプロジェクトで各々同時に作業を行った変更がリアルタイムで反映される。
共同作業での開発の有効化
サーバーの開始
共同作業での開発を有効化するには専用でサーバーとなるコンピュータを用意する。エンジンをコンピュータにインストールし、Serverアプリケーションを開始する(もしWindows専用サーバーを実行している場合は代わりにServer DX10+.exeのアプリケーションを実行する。これによりGPUがなくハードウェア アクセラレーションに対応していなくともシンプルなグラフィックスを表示できる。)。
アプリケーションによりEsenthelエディタの複数インスタンスの間の通信をハンドリングする。
サーバーは独自のプロジェクトデータをProjects(Server)フォルダに保持する。
サーバーへの接続
サーバーが起動して実行中となった後、エディタに接続できるようになる。
サーバーアドレスをエディタに入力して(Serverウィンドウで表示されているもの)、Eメール、パスワード情報を記入してConnectを押す。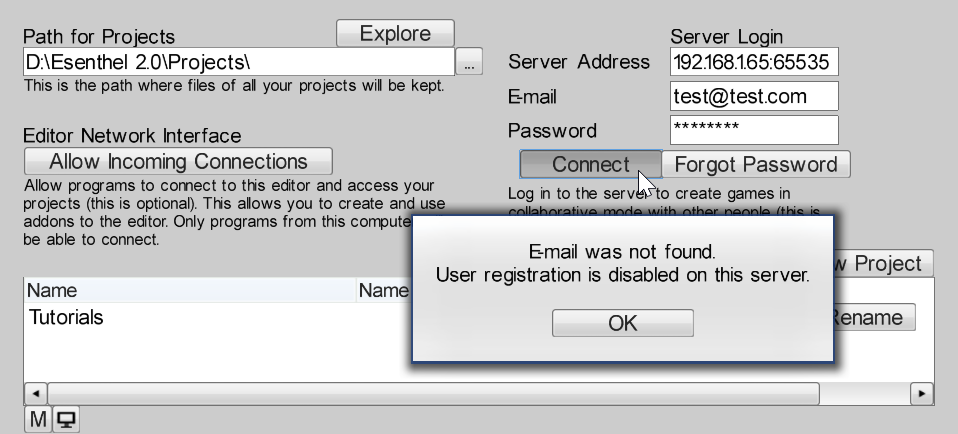
もしUser registration is disabled on this serverというメッセージが表示された場合ServerアプリケーションのUsersタブに遷移してAllow User Registrationボタンを有効化する。
その後はエディタに再び接続できる。
今度は登録が成功し、新規ユーザがサーバーのユーザ一覧に追加されたことが分かる。
デフォルトで新規ユーザはサーバーのプロジェクトへのアクセスが無効である。有効にするにはユーザの隣にあるAccessをクリックして別のプルダウンに変更する。開発者のデフォルトはNormalである。
プロジェクトの同期
サーバーに接続されるときエディタでプロジェクトを開くたびにサーバーバージョンと自動的に同期されます(接続されている他の開発バージョンと同期されます)。
画面の下部にあるOnlineフィールドをマウスオーバーすることでこのプロセスに関連した統計情報をプレビュー出来る。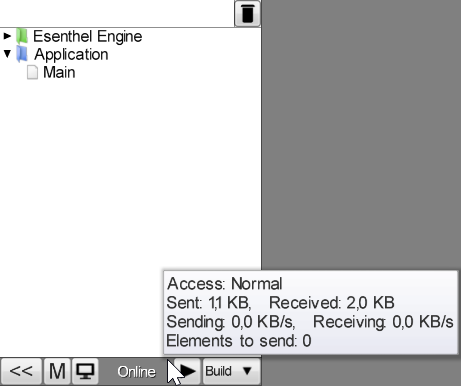
同期の仕組み
プロジェクト エレメントまたはそのプロパティを変更する度に、値を変更するだけでなく現在の標準時刻のタイムスタンプの値をセットする。
例えば二人の開発者がマテリアルのColorプロパティを修正したとします。2000/1/1に色を赤にして別の開発者が2000/1/8に緑にしたとします。ServerがColorプロパティを同期した場合、新しいタイムスタンプの緑の値となります。
コードの同期
全てのプロジェクト エレメントは自動的に同期されるように設計されています(画像、マテリアル、オブジェクト、ワールドでさえ)。唯一の例外はコードおよび幾つかのアプリケーションのプロパティです(例えばディレクトリ、ヘッダー、ライブラリ等)。
コードを同期する方法については次のトピックを参照して下さい。
ビデオチュートリアル
単位系
次の表に Esenthel エンジンのデフォルトの単位を整理した:
種類
|
単位
|
画面座標
| |
3D座標
|
メートル
|
角度
|
ラジアン
|
時間(Float)
|
秒
|
時間(Integer)
|
ミリ秒(1秒=1000ミリ秒)
|
速度
|
メートル/秒
|
角速度
|
ラジアン/秒
|
パフォーマンス最適化
アプリケーションのパフォーマンスを向上させるために推奨する検討ポイントは次のとおりである:
・視野角を可能な限り小さくする(レンダリング オブジェクトの数を減少し、方向性ライト シャドウの品質を向上させる)
・コーン ライトを優先して使用する(速い順から、ライトコーン、範囲の狭いポイントライト(中ではLightSqrが最速)、通常のポイントライト(LightPoint))
・ライト レンジを可能な限り小さくする(影響するオブジェクト数が減少し、シャドウ品質が向上する)
・キー ライトのみシャドウを有効化する
・キー オブジェクトのみシャドウを投影する
・Level of Detail (LOD) はメッシュのみで使用する。LOD は少なくとも 2 つにする(最初の LOD は常により複雑なシェーダであるテッセレーション、高低マッピング、ディーテール等を使用する。他の LOD では無効化されているが、これは 1 つの LOD では簡易なシェーダのメリットが少ないことを意味する)。
・アプリケーションのアップデートのとき動的メモリ割り当てを避ける(ヒープ/スタック/事前割り当てメモリを可能な限り使用する)
・メッシュ マテリアルで環境光の設定を避ける。環境光がメッシュがディファード レンダラで追加のレンダリングを必要とするためです。
・メッシュは可能な限り少ないマテリアル数とする。理想的にはメッシュごとにマテリアルが 1 つだけとする(レンダリングが高速となる)。
・ゲームをパブリッシュする際、データファイルが Pak ファイルに格納されるようにする(デフォルト設定)。ロード時間が短縮され、自動的なデータ暗号化/圧縮の選択肢ができる。
・ゲームをパブリッシュする際、 APP_AUTO_FREE_OPEN_GL_ES_DATA and APP_AUTO_FREE_PHYS_BODY_HELPER_DATA のアプリケーション フラグを有効化してメモリ使用量を抑える
・OGG 音声は WAV 音声より遅い。これは OGG 音声でリアルタイム圧縮展開が必要であるためであり、繰り返し再生、特に同時に再生される音声(例えば銃声)は WAV 音声として保存すべきであり、さらに CacheSound 関数も使用を検討すると良い。
・静的オブジェクトは地形 (Terrain) クラスを使用し、草のようなオブジェクトは草 (Grass) クラスを使用します(これらの型でカスタムのクラスを使用しない)。
・アプリケーションをマルチスレッドにする(上級者向け)
・エンジンのコードからディスプレイおよびレンダラ設定を調整する
プロジェクト エレメント
Folder
アイコン:
フォルダにはプロパティがなく、他の要素の整理をするために格納するだけの役割である。
Enum
Enum は C++ の enum と同様であり、エディタで作成されるため、エディタの他の部分で使用できる。例.オブジェクトのパラメータ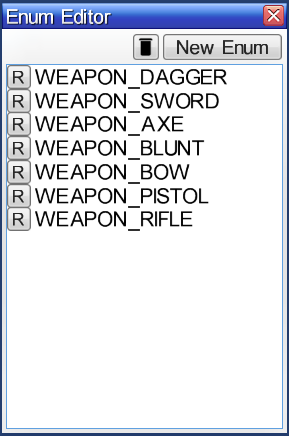
コードでの使用方法
Enumをエディタで作成した後、コードで直接使用できる。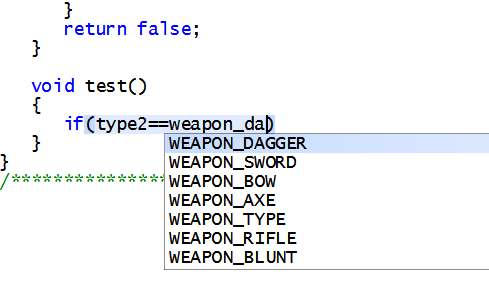
追加データ
エディタで作成した Enum は追加データがある:
・Name
・ID
C++ Enum クラスのおかげで enum の値の実際の Name および ユニークの ID にアクセス出来る。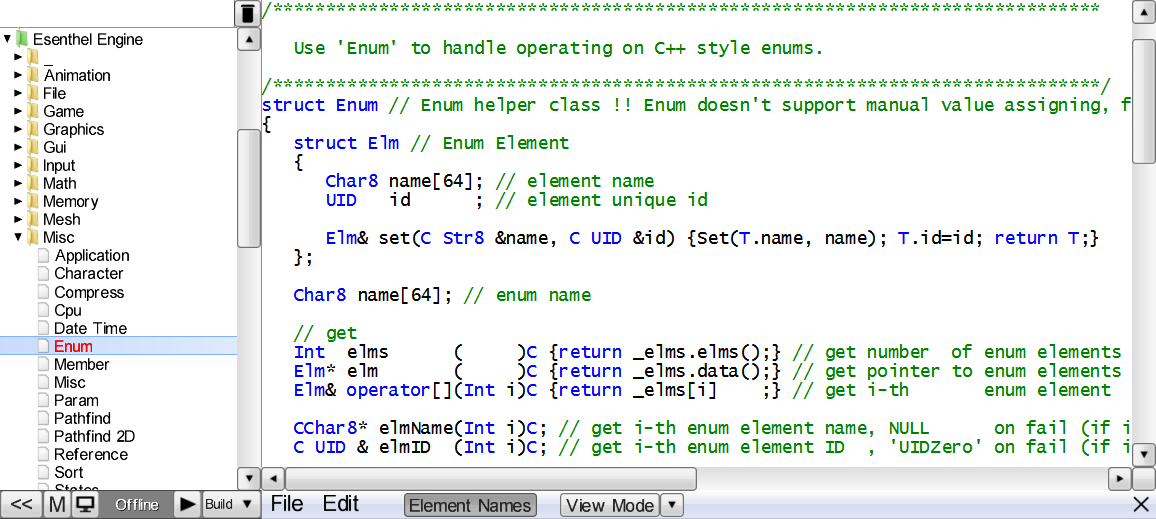
ユニーク ID は enum の値の生存期間では一定である。例えば最初に "WEAPON_KNIFE" を作成した後、 "WEAPON_DAGGER" に名前変更して、さらに再配置して WEAPON_TYPE enum の中で別のインデックスにすると、 ID は同じままとなる。
画像
アイコン:
対応する拡張子:BMP, PNG, JPG, WEBP, TGA, DDS, PSD, ICO
関連クラスと関数: Image, ImagePtr, Images
画像は次のプロパティを持つ:
・Type
・Compressed - 画像はエンジンが画像データとターゲット プラットフォームにで自動的に決定する圧縮形式のテクスチャとなる。次の形式のいずれかとなる:DXT1/BC1, DXT3/BC2, DXT5/BC3, ETC1, PVRTC4
・Full - 画像は圧縮されず、B8G8R8A8 形式の完全なデータとなる
・Alpha - 画像はアルファのみ A8 形式
・Mip Map - 画像はミップマップ生成され、小さなサイズの際にスムーズに描画されるが、ファイルサイズは大きくなる
・Power of 2 - 画像は最も近い 2 のべき乗にリサイズされる(例えば 260x220 画像は 256x256 画像になる)
・Alpha from Luminance - 不透明な画像にスムーズなアルファブレンドをしたい場合に使用。画像のピクセルを調整して不透明度を明度にもとづき設定してカラーチャネルも合わせて変更する。
・Mode
・2D Texture - 画像でハードウェア アクセラレーションを使用できる
・Cube Texture - 画像はキューブマップとして格納され 6 つの面(前、後、左、右、上、下)を持つ。例えばスカイボックスで使用できる。
・Software - 画像はシステムメモリに格納され(ビデオメモリではなく)、CPU のソフトウェア処理をより高速にする
画像アトラス
アイコン:
関連クラスと関数:ImageAtlas, ImageAtlasPtr, ImageAtlases
画像アトラスはひとつのテクスチャに複数の画像をパックしたものであり 2D スプライト アニメーションに最適である。
自動切り出し
複数のソース画像を一つのテクスチャに複合する場合、透明な境界線はクリッピングされ、より多くの画像が 1 つのテクスチャに収まるようにする。
右上隅の画面で確認が出来るが、元の戦士の画像が表示され、元はグレーまであった矩形が境界線にかなりの透明ピクセルがあり、不透明領域のみ保管するために赤い矩形まで小さくなりより多くの画像が一つのテクスチャに収まっている。
アンカー地点
ソース画像を準備するとき、画像の中心がアンカー地点、すなわちスプライトの場所にあることを推奨する(例ではキャラクターの足の位置)。
右上隅の画面で確認でき、アンカーが緑の十字線の位置としてハイライトされている。
サンプル
いくつかのソース画像と、それを統合したアトラス テクスチャを例示する。
ソース画像のパブリッシュ
ゲームが元のソース画像なしにアトラスのみ使用する場合、ゲームをパブリッシュする際にソース画像を含めないことを推奨する。
フォント
アイコン:
関連クラスと関数: Font, Fonts
フォントは高速に描画するため、事前にテクスチャにレンダリングした文字リストである。
対応している文字
フォントを作成するとき、対応している文字を指定す。
例えば、 "abc..ABC..123..!@#.." など標準の文字に対応する場合 "Ansi" を選択する。あるいは "aAeEoO.." などドイツ語の文字に対応する場合 "German" を選択する、といった形である。
フォントに含まれない文字を描画をすると ? 記号が表示される。
注意:中国語、日本語、韓国語の文字を含めると数千の文字を必要とするためフォント ファイルのファイルサイズが飛躍的に大きくなる。このような場合フォントの Size パラメータは出来るかぎり低くして Mip Maps に 1 または 2をセットし、 Shadow Blur を出来るかぎり小さくすることを推奨する。
フォントのファイルサイズを確認するにはプロジェクト領域でフォント エレメントを右クリックして Properties を選択する。この時、フォントの処理が完了していることが必要である(エディタを閉じて、フォント エレメントが処理中としてハイライトされてない状態)。
用途
フォントはテキスト スタイルで使用できる。
テキスト スタイル
アイコン:
関連クラスおよび関数: TextStyle, TextStyles
Text Style はテキスト描画を表すパラメータの一覧であり、フォント エレメントで動作する。
Text Styles は Gui オブジェクトで使用できる。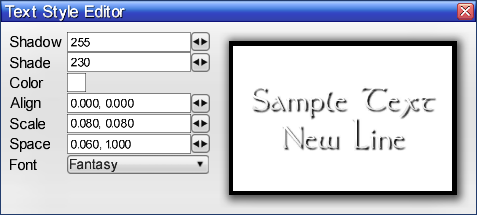
Gui スタイル
アイコン:
関連クラスおよび関数: GuiStyle, GuiStyles
Gui Style は Gui オブジェクトに Gui フレーム/パネルの描画を表すパラメータの一覧である
Gui
アイコン: 
関連クラスおよび関数: GuiObjs
Gui は次の要素から構成されるグラフィカル ユーザ インタフェースである:
Button
CheckBox
ComboBox
Custom
Image
ProgressBar
Region
SlideBar
Slider
Tabs
Text
TextLine
Viewport
Window
オブジェクトはスクリーン座標にもとづき配置される。
プログラミング
コードからオブジェクトにアクセスするには最初にエディタで名前をセットし、次に名前でエレメントにアクセスする。
マテリアル
アイコン: 
関連クラスおよび関数: Material, MaterialPtr, Materials
Material はメッシュをレンダリングする際に使用するパラメータの一覧である。
Materials に適用できるテクスチャはイメージ プロジェクト エレメントおよびディスク上のファイルの両方である。
次の Texture Types がサポートされている:
Color
Alpha (Opacity)
Bump
Normal
Specular
Glow
Detail
Color
Bump
Normal
Macro
Reflection
ウォーター マテリアル
アイコン:
関連クラスおよび関数: WaterMtrl, WaterMtrlPtr, WaterMtrls
ウォーター マテリアルは湖、川、海をレンダリングするときに使用するパラメータの一覧である。
物理マテリアル
アイコン:
関連クラスおよび関数: PhysMtrl, PhysMtrls
物理マテリアルは物理特性のプロパティ一覧である:
Static Friction - オブジェクトの静止摩擦係数
Dynamic Friction - オブジェクトの動摩擦係数
Bounciness - オブジェクトの衝突時の弾性係数
Damping - オブジェクト速度の減衰率
Density - オブジェクトの体積あたり重量
物理ボディおよびアクターで使用される。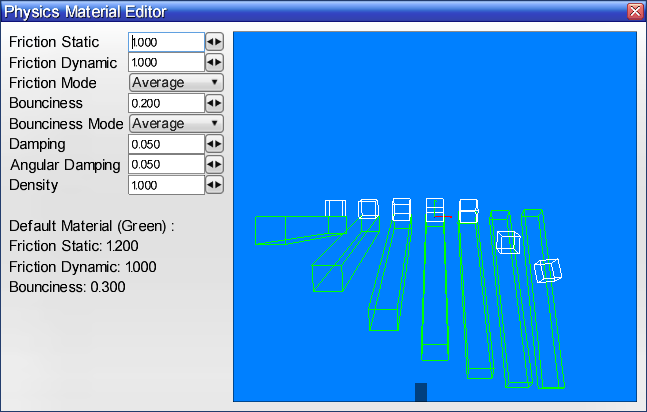
オブジェクト クラス
アイコン:
関連クラスおよび関数: Game.ObjParams, Game.ObjParamsPtr, Game.Objs
オブジェクト クラスはオブジェクトの型である。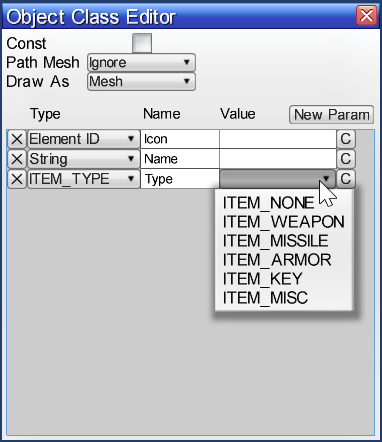
例えば、次のクラスとすることが出来る:
Characters
Items
Vehicles
オブジェクト クラスにはこのクラスの全てのオブジェクトで使用する共通パラメータの一覧を定義できる。
例えば、キャラクター クラスでは次のパラメータを定義できる:
Strength
Dexterity
Magic
次にこのクラスのオブジェクトを生成し、各パラメータの値をセットできる。
Warrior:
Strength=10
Dexterity=5
Magic=0
Rogue:
Strength=5
Dexterity=10
Magic=0
Mage:
Strength=0
Dexterity=5
Magic=10
アニメーション
アイコン: 
関連クラスおよび関数: Animation, Animations
アニメーションで特定のスケルトンのボーンにおける向き、位置、スケールを定義できる。
さらにアニメーションの特定の時点で起こるイベントに名前をつけて定義できる。
例えば、画面の走行アニメーションでタイムラインの赤線によりステップのイベントが定義されていて、地面に足が着地する瞬間に音声を再生させるイベントに名前をつけることが出来る。
インポート
プロジェクトに3Dモデルをインポートするとアニメーションも自動インポートされる。
複合アニメーションの分割
アーティストによって複数アニメーションをひとつで作成し各々が異なるキーフレーム範囲にわたる場合がある。
- 3Dモデルをインポートした後ひとつのアニメーションのみが作成される
- アーティストにより次のキーフレーム範囲に渡る複数のアニメーションを示される
- 1-50: 直立アニメーション
- 55-97: 歩行アニメーション
- 103-137: 走行アニメーション
- アニメーションを複数エレメントに分割するには:
- アニメーション エレメント上で右クリックして Reload を選択
- Reload ウィンドウで開始から終了までキーフレーム範囲を指定できる
- 提供されたアニメーションの範囲(55 から 97、等)を入力し Yes を押下
- アニメーションの完了後、歩行アニメーションのみ表示される
- 残りのアニメーションの追加:
- アニメーション エレメントを右クリックして Duplicate を選択すると既存のアニメーション エレメントが複製される
- 複製されたアニメーション エレメントを右クリックして Reload を選択。先ほどと違うキーフレーム範囲を指定してYesをクリック
- 全てのアニメーションが表示されるまで繰り返す
上級者向け
部分的なアニメーション
ボーンにキーフレームがない場合、アニメーションのブレンディング プロセスでに影響しないのみである。
キーフレームがないことはボディ全体に影響しないが腕や顔など特定のボーンのみに影響するアニメーションを作成する場合に役に立つ。
このようなアニメーションで腕や顔のボーンなど特定のボーンのみキーフレームがあり、スケルトンにアニメーションを適用しても特定のボーンにしか影響しない。
キーフレームの種類
Esenthel アニメーション システムは次のキーフレーム種類に対応している:
Target Orientation (ボディのアニメーションの場合に推奨)
Relative Rotation (顔のアニメーションの場合に推奨)
Position Offset
Scale Factor
Target Orientation と Relative Rotation キーフレームの違い:
ボーンの向き/回転を制御する機フレームが二種類ある。
Target Orientation keyframes operate on Vector Directions (Blend Factor specifies length of the direction vector) - final bone orientation is the normalized sum of vector directions from all blended animations.
Relative Rotation keyframes operate on Rotation Angles (Blend Factor specifies scale of the rotation angle) - final bone orientation is the sum of rotation angles from all blended animations.
Both types will behave differently when blending multiple animations together with different blend factors.
For example, having following set of bones:
You can set following keyframes:
Default pose as Target Orientation
Bend pose as Target Orientation
Bend pose as Relative Rotation
Now you can see that blending Target Orientation animations will behave differently than blending Relative Rotation animations:
Target Orientation
No animation keyframes applied
Bend Target Orientation with 0.2 Blend Factor
You can notice that applying target orientation with even the slightest blend factor can snap the bone orientation
Bend Target Orientation with 1.0 Blend Factor
Final result is the same as using 0.2 blend factor
Bend Target Orientation with 1.1 Blend Factor
Final result is the same as using 0.2 and 1.0 blend factors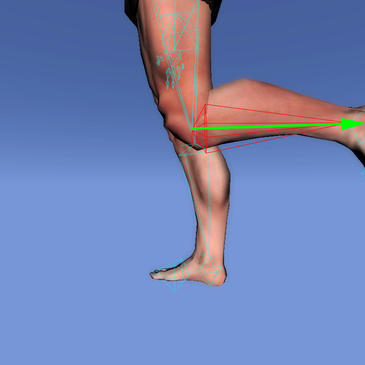
Default Target Orientation with 1.0 Blend Factor
Default Target Orientation with 0.5 Blend Factor
+Bend Target Orientation with 0.5 Blend Factor
Final result is the normalized sum of direction vectors from both animations
Relative Rotation
Bend Relative Rotation with 0.5 Blend Factor
Relative Rotation keyframes operate on angles, so applying animation with 0.5 blend factor will rotate only by half
Bend Relative Rotation with 1.0 Blend Factor
Bend Relative Rotation with 1.5 Blend Factor
Applying bigger blend factor to relative rotation animation will rotate the bones more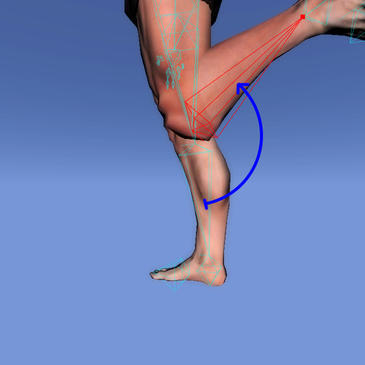
アイコン設定
アイコン: 
Icon Settings are a list of parameters which can be used when creating Icons.
You can use one Icon Settings Element for multiple Icons, so that all of them will be rendered using the same settings.
アイコン
アイコン: 
関連クラスおよび関数: Image, ImagePtr, Images
Icon is a 2D Image which is created from a 3D Model with custom Icon Settings.
To create an Icon please Drag and Drop previously prepared Object onto the object slot, Icon Settings onto the icon settings slot, and press "Create".
After creating an Icon you can use it as a regular Image, both in the Editor and in the Codes.
環境
アイコン: 
関連クラスおよび関数: Environment, EnvironmentPtr, Environments
Environment is a collection of parameters that describe following elements:
Ambient Light
Bloom
Clouds
Fog
Sun
Sky
You can disable each element using the checkboxes, and configure their properties by clicking on the buttons so the property windows pop up.
Applying Environments
You can access Environments manually from the codes and apply them there, or apply them onto Worlds as their default Environment.
To apply as a default Environment of a World:
Open desired World Element
Drag and Drop an Environment Element at any location onto the Viewport of currently opened
ワールド
アイコン: 
関連クラスおよび関数: Game.WorldManager
Worlds are "Game Levels" made out of Areas, which can have Objects and chunks of Terrain.
They are edited in the World Editor.
Here is a sample diagram of a World:
Environment - Each World can have a default Environment assigned
Areas:
Objects
Terrain
Pathfinding data
Lakes and Rivers
Waypoints
Examples
Worlds can look both "Indoor" and "Outdoor", depending on Environment settings.
ミニマップ
アイコン: 
関連クラスおよび関数: Game.MiniMap
Mini Map allows for automatic 2D mini map creation based on previously created 3D Worlds.
To use, Drag and Drop a World Element onto the World slot, optionally override its default Environment by Drag and Dropping a different one to the Environment slot, and press the "Create" button.
Parameters:
World - World Element from which to create the map
Environment - Environment Element used to override the default one (if none is specified, then default Environment of the World will be used)
Areas Per Image - Number of World Areas to be included per one image
Image Size - Resolution (width and height) of a single image
Mini Map will be created as a series of Images which you can later access from your game, each image will cover only some of the areas in the world.
サウンド
アイコン: 
対応している拡張子: WAV, OGG
関連クラスおよび関数: Sound, SoundPlay, Music
File Formats
Esenthel supports sounds in following formats:
Format Compressed File size for a 10 second sound CPU usage Recommended quality Recommended usage
WAV No 1.68 MB Low 44.1 kHz, 16-bit, stereo Sounds that are played very repetitively (bullet shots)
OGG Yes 0.12 MB Medium 44.1 kHz, 96kbps, stereo Sounds that are not played very repetitively
Following program is recommended for editing sounds and file format conversion - GoldWave.
Programming
Sound Positioning
Esenthel supports playing sounds in both 1D and 3D space.
When played in 3D space, each sound has its own position, making its final volume to be dependent on the Listener position (see C++ 'Listener' object).
Music System
Esenthel provides built-in classes for music systems, which operate on playlists (see C++ 'Playlist' class).
Playlist is a list of audio tracks, for example:
You can make a playlist called "BattleTheme", which contains following tracks:
Battle 0.ogg
Battle 1.ogg
Battle 2.ogg
You can then use this playlist to be played by either 'Music' or 'Ambient' music systems (C++ objects).
The music system will start playing this list of tracks, with crossfade support, and optional shuffle.
Volume Control
Esenthel provides separate volume control of following sound types:
Sound Effects
Voices
Music
Ambient
Global
ビデオ
アイコン: 
対応している拡張子: OGG, OGM, OGV
関連クラスおよび関数: Video
File Formats
Esenthel supports videos encoded using Theora codec.
To convert videos to Theora, please use this free tool - ffmpeg2theora.
ローファイル
アイコン: 
関連クラスおよび関数 File
Raw File is a raw binary copy of the original file, use it to support custom file formats in the engine.
You can use C++ 'File' class to read its contents.
ライブラリ
アイコン:
Library is meant to work as a Folder for Source Code files which are used by all Applications in the Project.
Please store inside it only Source Code files and Folders.
Libraries are useful for example in networked applications, where there is Client Application, Server Application and they both use some shared set of Codes.
In that case shared Codes should be stored separately outside of the Applications, inside Library element.
This will make all of the Code files from Library element to be accessible by all Applications.
In the example to the right, all Codes from the "Shared" Library, will be usable by "Client" and "Server" Applications.
アプリケーション
アイコン: 
Application is a set of Source Code files which upon compilation create an executable, such as EXE, DLL, APP, APK.
Application Properties
You can change Application Properties, by right-clicking on the Application Element.
There are following properties:
Include Libraries - These are static libraries (such as *.lib, *.a files) to be linked together with your Application during building process
Include Directories - These are additional paths to look in, when searching for headers
Include Headers - These are custom headers to be used during compilation
Package Name - Application package name.
It must be in following format: "com.company_name.app_name", where 'company_name' is the name of developer/company, and 'app_name' is the name of the application.
The package name should be unique, its name parts may contain uppercase or lowercase letters 'A' through 'Z', numbers and underscores '_'.
Once you publish your application, you cannot change the package name.
The package name defines your application's identity, if you change it, then it is considered to be a different application and users of the previous version cannot update to the new version.
Build Number - Application build number, used to identify the version of the application.
This must be specified in order for the application to update correctly through online stores (for example Apple App Store and Google Play Store will not allow you to update your Application without it having a newer Build Number).
Typically you should increase this value by 1 when making each new release.
Preferred Storage - Preferred installation location for the application.
Internal - The application must be installed on the internal device storage only. If this is set, the application will never be installed on the external storage. If the internal storage is full, then the system will not install the application.
External - The application prefers to be installed on the external storage (SD card). There is no guarantee that the system will honor this request. The application might be installed on internal storage if the external media is unavailable or full, or if the application uses the forward-locking mechanism (not supported on external storage). Once installed, the user can move the application to either internal or external storage through the system settings.
Auto - The application may be installed on the external storage, but the system will install the application on the internal storage by default. If the internal storage is full, then the system will install it on the external storage. Once installed, the user can move the application to either internal or external storage through the system settings.
Supported Orientations - Supported device orientations for mobile platforms
Embed Engine Data - If embed basic engine data into the executable file, so it doesn't require separate "Engine.pak" file.
Embedded data will include only simple shaders and will not allow for advanced 3D rendering.
This option is recommended for Application Installers/Launchers which want to be distributed as standalone executables without any additional files.
Default value for this option is false.
Publish Project Data - If include project data when publishing the application.
Disable this option if your application will not initially include the data, but will download it manually later.
Default value for this option is true.
Publish PhysX DLL's - If include PhysX DLL files when publishing the application.
Disable this option if your application does not use physics, or it will download the files manually later.
This option is used only for EXE and DLL targets.
Default value for this option is true.
Publish Data as PAK's - If archive data files into PAK's.
Disable this option if you plan to upload the application using Uploader Tool, in which case it's better that the files are stored separately (instead of archived).
Then you can make your Installer to download files from the server, and archive them as PAK's.
Read more about this in the Publishing section.
Default value for this option is true.
Icon - Application icon, you can set it by Drag and Dropping an Image Element from the Project, onto the Icon slot.
Portrait Image - Application splash screen displayed when starting the application from portrait orientation, you can set it by Drag and Dropping an Image Element from the Project, onto the Image slot. Currently this is used only for iOS platform.
Landscape Image - Application splash screen displayed when starting the application from landscape orientation, you can set it by Drag and Dropping an Image Element from the Project, onto the Image slot. Currently this is used only for iOS platform.
Embedding Assets
Esenthel supports embedding some of the Project Assets directly in Application Executable file, so it doesn't require a separate file for the data.
In general you should not store other elements than Folders and Codes in an Application.
Including other Elements in an Application will make them automatically embedded inside the executable file, making it bigger.
By default Project Assets are stored in separate "Project.pak" file.
However for certain Applications, such as Installers, it may be desirable to distribute only the executable file without any additional files.
In such case you can embed some of the Assets, such as Images used by the installer, in its executable file, by moving the Element to be located inside the Application Element, allowing it to access the Assets without additional pak files.
In the example to the right, you can notice that the Image Element is stored directly inside the Application.
Upon building of the Application, you will be able to distribute just the executable file without any separate files for Assets (like PAK files), and it will be able to use that Image, because it's embedded in the executable file.
コード
アイコン: 
Code is a C++ Source Code element.
It is edited in the Code Editor.
Its location in the Project affects which Applications make use of it:
Inside an Application - will affect only that Application
Inside a Library - will affect all Applications
Outside of Library and Applications - will not be used
Codes unlike other Project Elements, aren't automatically synchronized, they need to be synchronized manually.


0 件のコメント:
コメントを投稿